How to get started with Python on Windows

Python programming language, created by Guido van Rossum is really a wonderful and powerful language and it is nowadays widely used high-language programming language for general purpose programming.
Python does not come up pre-installed with any version of Windows OS as compared to other Operating Systems i.e. Linux and Unix in which python is already installed in it.
Using this post of tutorial, you can easily install python on your Windows 10 Operating systems by performing following steps mentioned below:
Step 1: Download a recent version of Python Installer
First of all you have to download a installer file of python by browsing to webpage www.python.org as shown in following snapshot. After browsing to said link, when you hover over Download on navigation menu on page as highlighted below, you will be provided two options of two versions of python installers i.e. 3.x.x and 2.x.x. In this tutorial you will opt to download Python 3 by clicking on Python 3.6.1.
Note: Python 3 version was first released in 2008 and final version 2.7 of Python 2 published on mid of 2010. Whereas Python 2 has find new releases for last 7 years as 3.x is under development and many different stable releases including 3.3 to 3.6 versions have been published. So, you can find recent standard improvements only in Python 3.
Step 2: Open downloaded installer file and install Python
After downloading of installer file gets completed that you can confirm on bottom-left corner of chrome browser if you are using as mentioned in following snapshot, click on down-arrow button and click open to start installation of Python
Then you will be displayed following installation window and in that window you have to check option of ‘Add Python 3.6 to PATH’ and then click on "Install Now" link show below
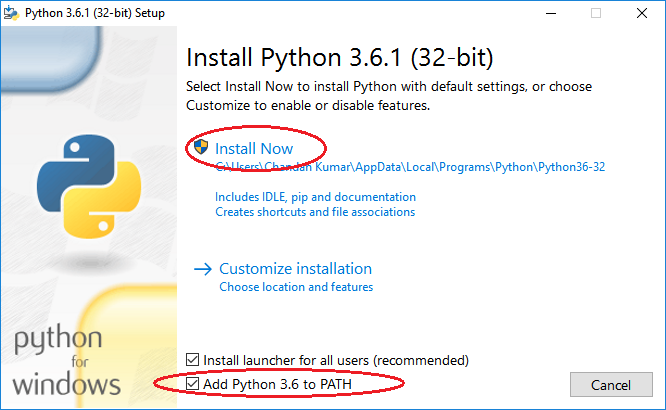
Installation process will start as mentioned in following snapshot when you click on "Install Now" link discussed above.


Step 3: Open Command Prompt Program to run Python
In this final step of tutorial, you will check whether Python is running on you Windows or not. And finally you will run your line of Python code using Terminal Command Prompt or CMD window.To check Python installed on your system, open terminal Command window and type word "python" and press Enter button as highlighted in snapshot below.
In the above figure, you will find that you will displayed an actual version of Python installed on your windows system and then Python Interpreter will start asking you about python code you want to run as a result of entered command "python".
Now Python is ready to start conversation with you using python programming language.You are going to run a line of python code for printing a string of characters i.e. “Being Pythonist” using printkeyword e.g. print(“Being Pythonist”) as highlighted in following snapshot. After you type a line python code press Enter button and you will find a result of typed python code.

Congratulations Guy! Now your python code is running on your windows OS after following above steps. In the next posts, I will guide you learning Python Programming language using different tutorials.
If you have any query regarding this tutorial then type on comments section of this post.
If you have any query regarding this tutorial then type on comments section of this post.
Comments
Post a Comment